
I have a controller for an electric throw blanket that I would like to repair, but I have no experience soldering on boards
You can see at bottom left a yellow box and a resistor. Something has burnt out in this area, and likely both will need to be replaced at a minimum
I would also need help identifying parts. The yellow box is embossed ‘Tenta’ and has printed on the side ‘TC MEX/TENTAMKP 0.1 uf 275VAC’ with some other markings obscured or damaged
Is this an achievable project?
Jesus, this isn’t a slight against you OP but as an electronics engineer I feel I need to have a rant about the shoddy design here:
First of all, I have no idea what that component is dangling off the burnt-out through-hole resistor is or why it’s there.
Surely it can’t be a part of the temperature control loop, so I would guess it’s a thermal fuse to shut off the blanket if that resistor burns because it handles power to the heating element.
If so, what THE FUCK were the designers thinking?! Couldn’t afford even a small power resistor with a heatsink and a cheap thermocouple to a temp sense IC?!
Nah it’ll be ok, either it burns out the resistor and the customer is not injured or the customer’s house burns down. Either way no deaths, just complaints about our shitty build quality.
Second, they’re using WAY too much solder for these surface mounts components.
And third, why has R16 shifted from it’s pad? Bad soldering job from too much solder? Bad placement from the PNP machine? Or, god forbid, something gets hot enough to cause the solder under that resistor to start melting?
It’s genuinely shocking the amount of stuff that’s just being allowed to be sold these days.
If you can’t get the blanket repaired OP, please consider sending this to Big Clive as he’d have a field day with this.
Thanks, you’re my own personal Big Clive
I’ll take care, I definitely don’t want to burn the house down
Am I also seeing heat shrink tubing that hasn’t been heat shrunk?
It self-shrinks when the board catches fire
To the second and third issues, I think they happened because of bad settings in the wave soldering machine, and/or not prepping the board beforehand. Maybe the wave was to high, or the speed too slow. Many times you have to cover the smd components with a bit of painters tape. Even the orientation of the board on the frame can matter.
There’s specific wave solder glue for smd components. Most likely all components were glued down. You can still see the off-white glue on the ICs in between the leads.
The parts that should not be soldered are usually masked off. Either with a mold or kapton tape/flexmask. Never Painters/scotch tape, since it will melt and/or burn.
Don’t know about the glue thing, the smds were put by a machine, but they would move like the one in the picture if you didn’t set the machine right. I can’t say for sure with that resolution but I think those white things are the shiny reflections on the pins/solder. I will look into these smd glues tho, that could come handy.
And about the tape I have to say that my experience with wave soldering is not very vast, literally just one place, but they used painters tape, of the cheapest kind, and it worked just fine—no melting (it’s paper?), and no burning since the solder doesn’t get that hot (~200°C), the tape might stay a bit wet from the flux also idk.
It looks like a board where they indeed probably put the components on by machine, however without solder paste, since it was going through the wave solder anyway. But you would need to glue the components down then.
That’s why there is so much excessive solder. If it was printed with solder paste, it wouldn’t have this much solder.
I would be extremely careful, since it failed for a reason and you were very lucky not to set the house on fire, which looks like it came pretty close to.
Thanks. Can you help identify what the components are? It would be interesting to at least have an idea what the failure mode was. It appears burnt but there was no smoke and no apparent smell until I opened the case days later


Technically, since they are throughhole components and nothing specific (Fried resistor, 0,1uf capacitor and maybe a damaged thermal fuse.) this would be a great starter project for soldering. The issue is that those components failed becasue of something happening and unless you find out and fix what caused this you can change those components as many times as you want they will just blow again.
Thanks, as a learning exercise I am willing to have one good go before I turn the electronics into waste, but if they blow again that may be the end of it
I’ve been given an opportunity to ask ‘genuineparts’ where I should buy parts 😉 (I’m in Australia)
I think DigiKEy and Mouser have Aussy sites where you would probably be able order the parts.
Any chance of identifying the burned-out part on the left? If not, I’d leave this to professionals (repair cafe, maybe). A throw blanket works at mains voltage, so errors might have serious consequences.
Apart from that, you don’t know what caused that burn, so that cause might still be around, and instantly burn down any repaired board again.
So my recommendation is: NO.
Thanks. It seems wasteful to throw it away but I’m working on my loss aversion 😉 and technically the blanket is still a blanket, just less warm
The thing seems to be not even two years old - maybe you can return it?
I’m pretty I bought it only a year ago, but I’m not 100% sure where and can’t find the receipt
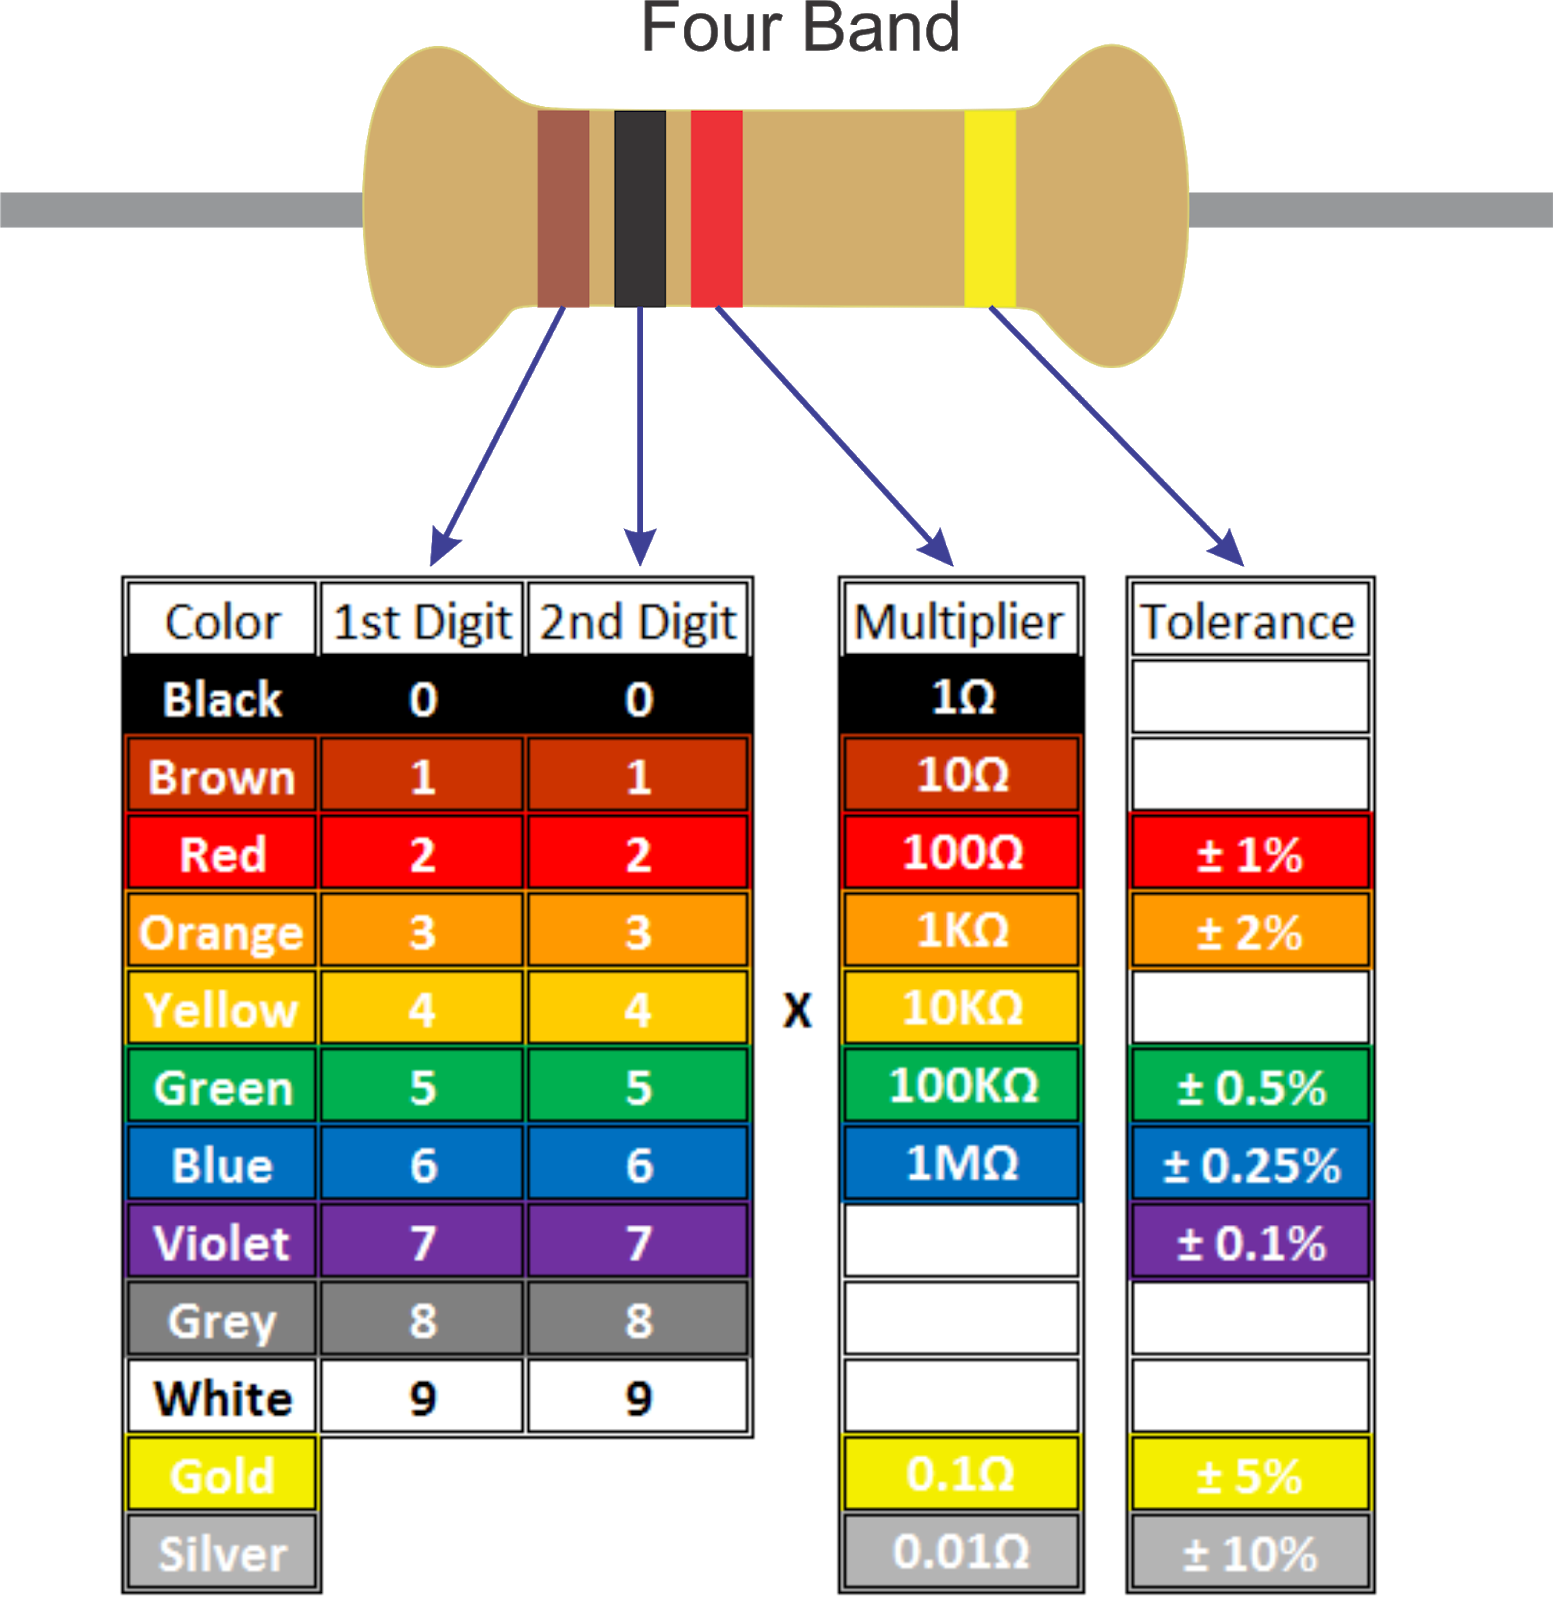
If those components are the only issue then that should be reasonably easy to fix with a soldering iron. The yellow box is a film capacitor of some kind, you can most likely just find one that is rated for the same or higher voltage and the same capacitance (0.1uf). The part that burned is a power resistor like you said, the color bands on the part can tell you what resistor value it is, and i would guess it’s rated for 0.25W perhaps
There is something on the U1 chip, is that just some dirt or is it damaged as well?
Thanks, if that is the pad below the resistor I assume that component is also damaged and would likely replace it as well. I’ll do some searching and reading on the capacitor, is a U1 chip something generic or will it have markings to indicate specs?
A bit of context for you:
U1 is a reference for the PCB designer and assembler (if soldered by hand).
The information you need to find a replacement is the etched text on top of the IC (Integrated circuit, a.k.a “chip”).
If you’re able to read that, put the whole thing into Google or Octopart or your electronics component supplier of choice (Mouser, DigiKey, Farnell, etc). and you should find the IC you need.
Thanks!


