
I’ve tried to report the issue to Prusa support but they keeps trying to diagnose it as user error. But at this point I’m at a loss and presume that it’s either a firmware issue or a sensor issue on my unit.
Either way im very disappointed.
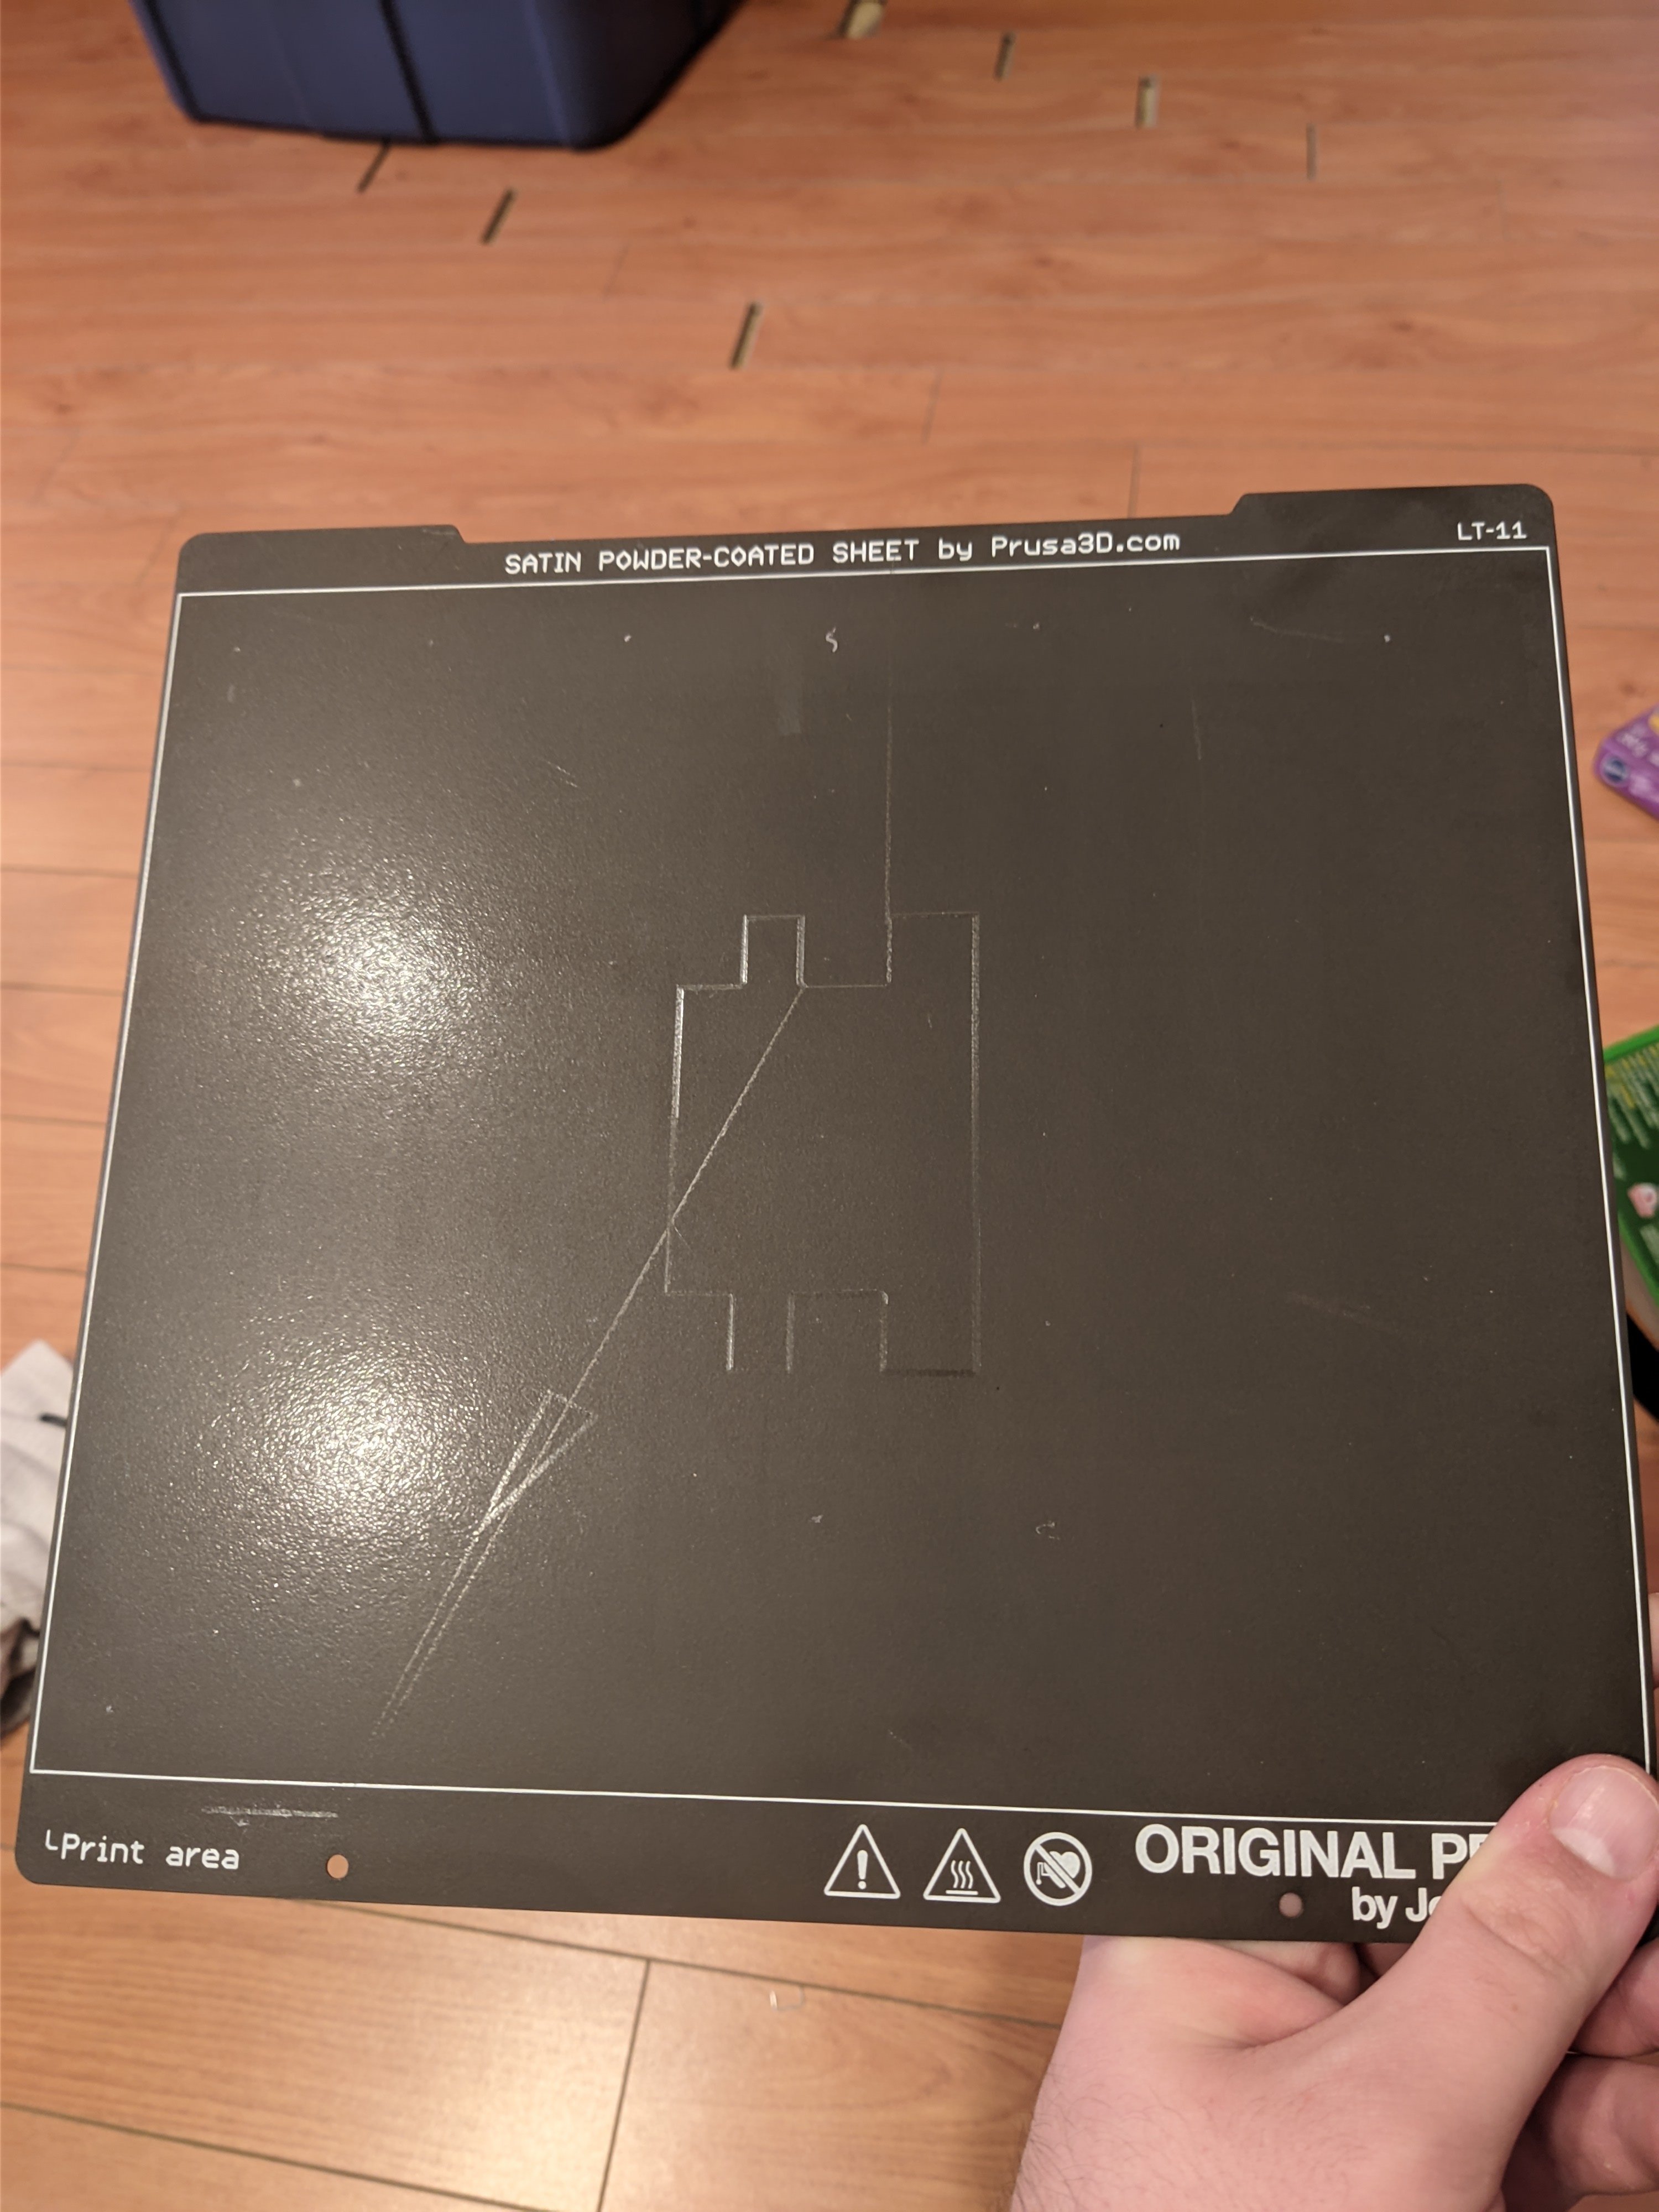
And before you ask, this is the opposite side
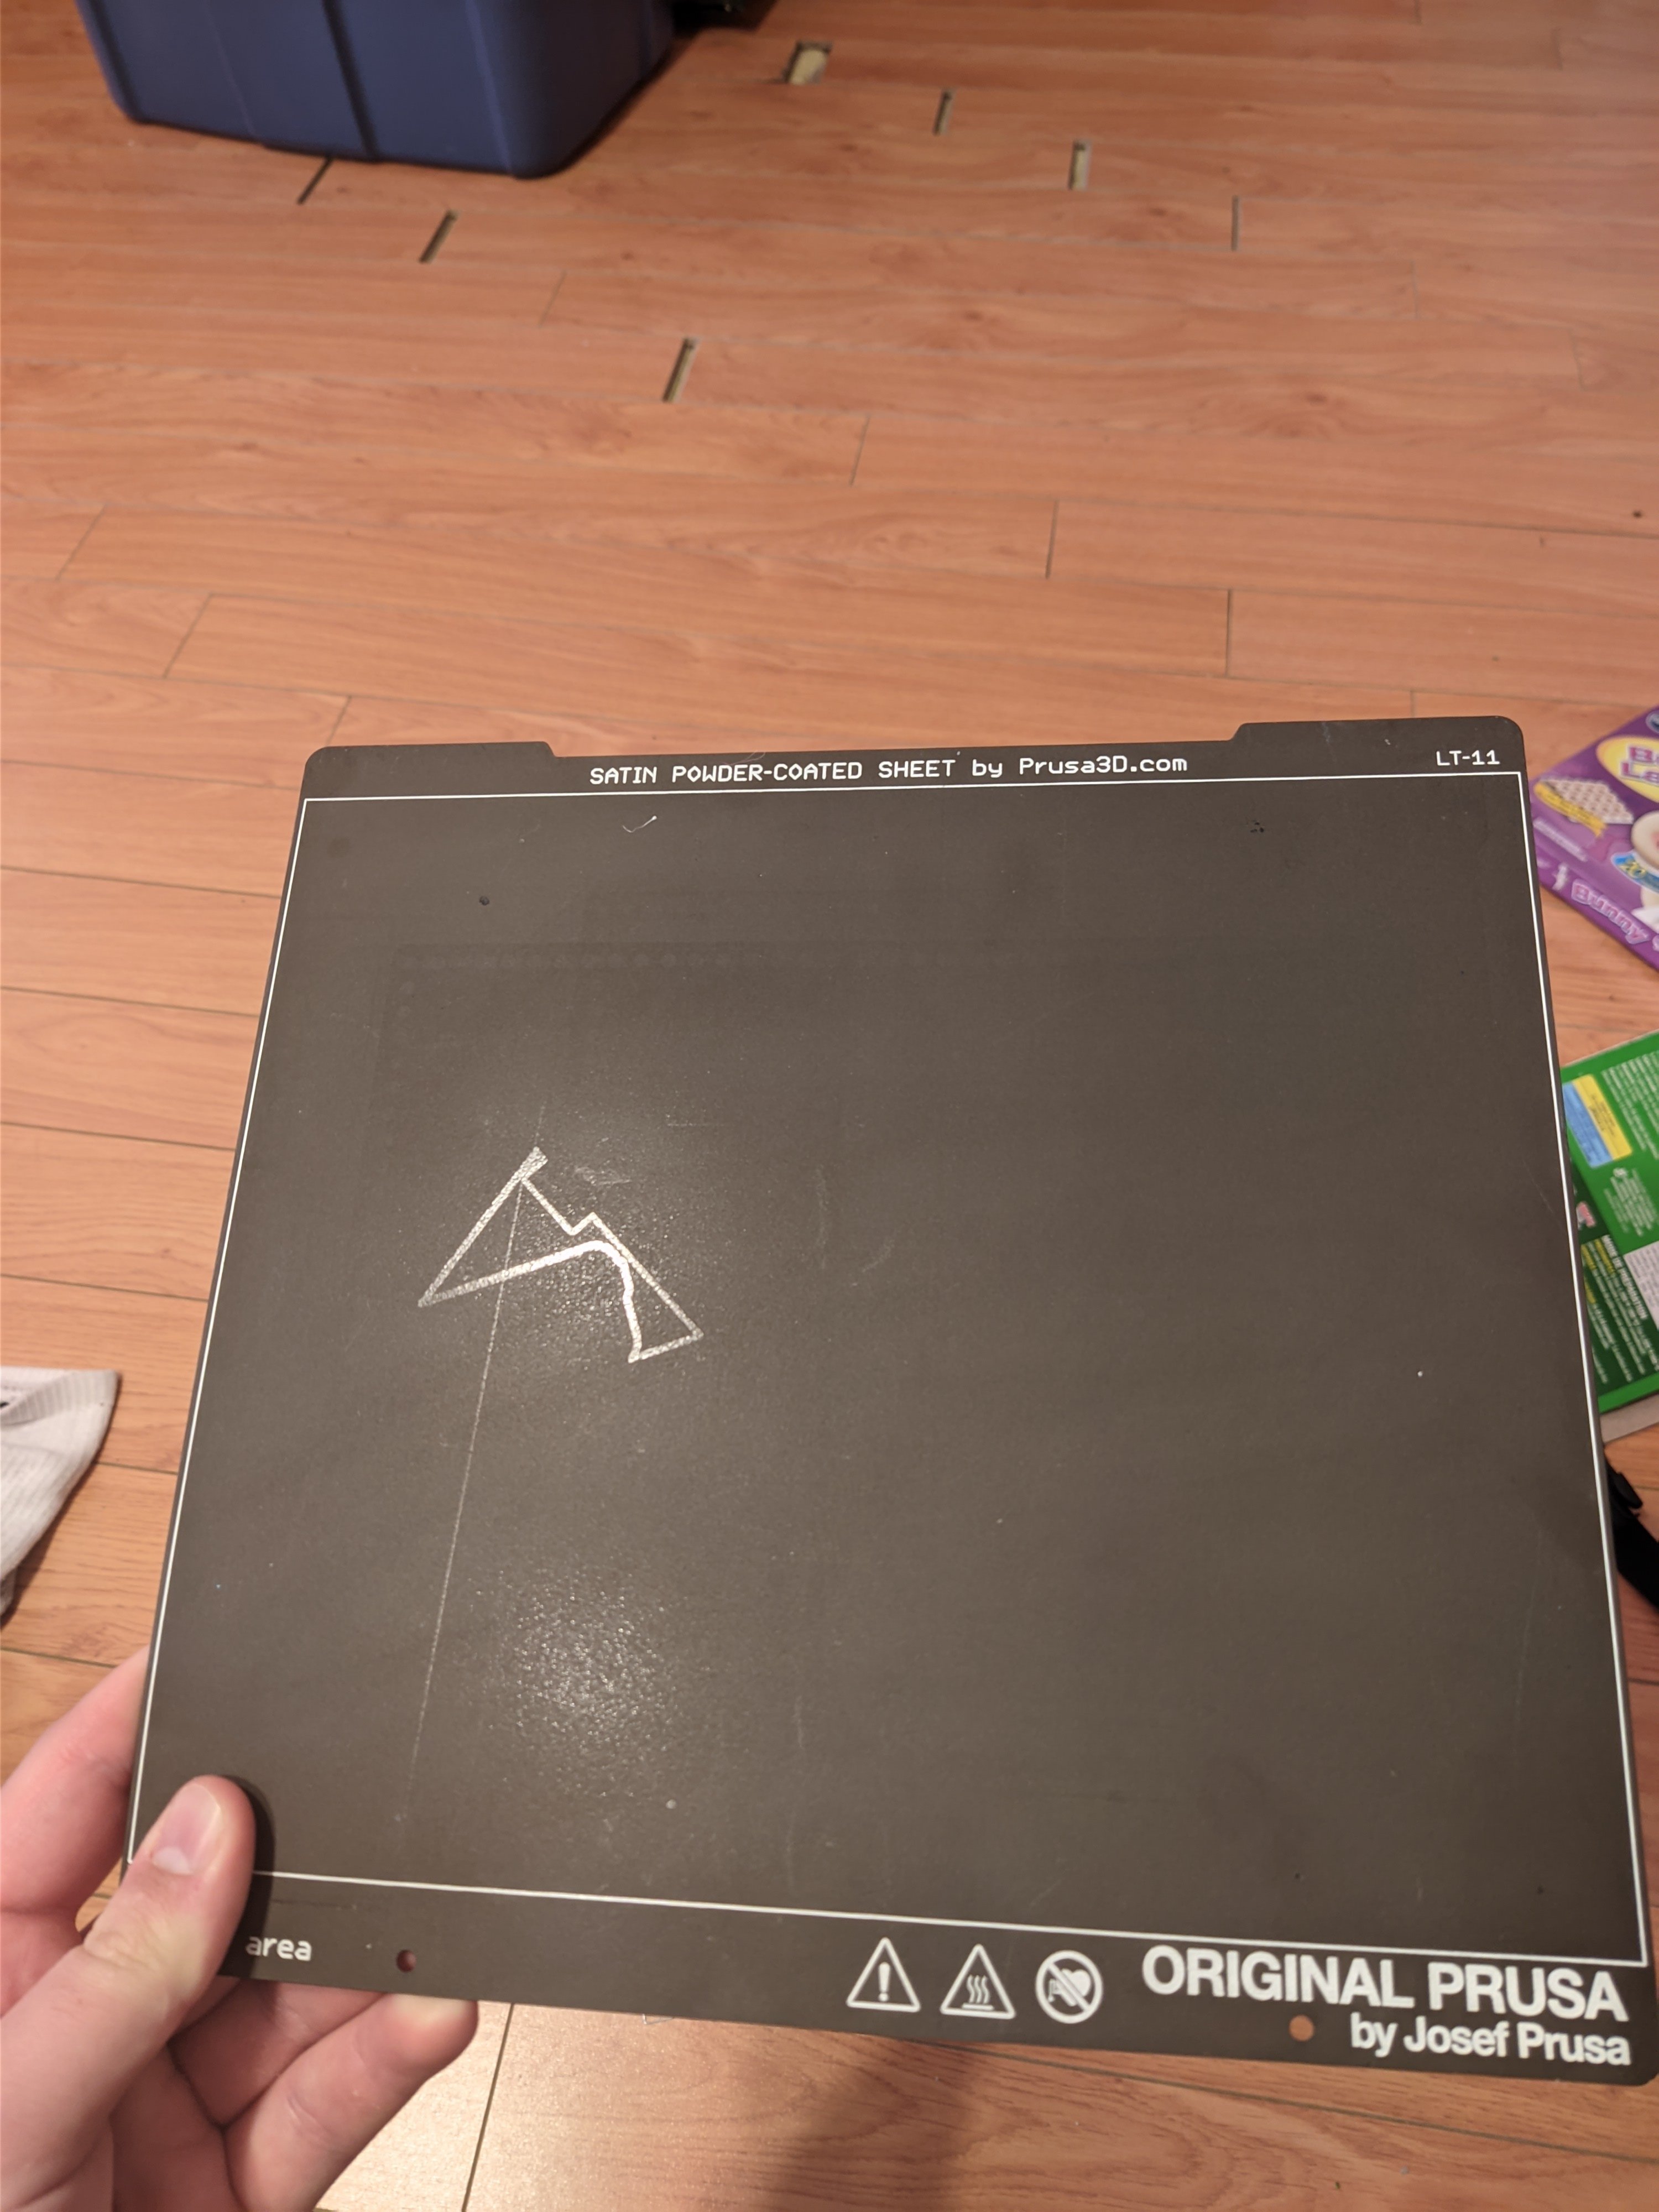
EDIT: I will note that this print sheet is ruined for my use case, since those patterns will be shown on the underside of my prints. But the print surface still works and can be used without issue… if you ignore the gouges that are being detailed into every print.
What is going on with your flooring my guy
Living in a 30 year old apartment for 5 years and no way to do repairs. It was liked this when I moved in.
$1,500 CAD/Month (current market $2000) Welcome to Halifax, NS!
I’d just shove some wood filler in the gaps to at least have a smooth floor even if it doesn’t look great. I feel like I’d stub my toes on that shit all the time.
What op should do is tap/slide the boards all to one end so the gaps all come together as one big gap at the less important side of the room. Maybe there’s a bookcase or tv against that wall so they don’t step there.
And nail on small nail in the end board to keep it in place
With gaps like that, it will be easier to use wood to fill them.
Those look like pretty big gaps, close to 1" on the biggest. That’s gonna take a whole of woodfiller.
If it’s a floating click together floor…Packing tape.
Put like 6 layers down long ways on the board with a foot or so sticking up to use as a handle.
Hold the tape, and kick the tape where it just starts to go up. If done correctly, it will scoot the board along in the direction you kicked. Repeat until gap is now at edge of room, ideally under baseboard and invisible.
Bed leveling error
I just had to read up on the MK4 because I don’t own one. Apparently this machine uses a load cell on the bed to detect the nozzle touch? That means that to home Z or mesh level the bed, the nozzle has to touch the build surface. This strikes me as a rather bad idea. I can think of tons of situations such as a pointy diamond or ruby nozzle, a very hot nozzle, or a nozzle with hardened crud stuck to it all causing damage to the print sheet, not to mention the potential for damage to the nozzle itself.
Ideally the nozzle should never, ever touch the print surface. For any reason.
There’s a purpose behind things like the BL Touch having a soft plastic probe on the end.
In the cases you describe it should fail by ruining the print, not the build plate though. If there is something between the nozzle and the plate, it will be too far away from it after calibration, not too close.
Oh I’ve had my fair share of issues with this. i.e. little specs of the previous print color is stuck on the next print since I missed it during print clean up.
But if I am honest, for a normal spring steel PEI sheet it’s perfect. And I prefer this to the magnetic solution like on the Mini since it lets me use Garolite/G10.
I’ve only seen this issue with the satin bed.
Hey, just wanna point out that having a touch sensor built into the nozzle is definitely not unheard of, my printer (Neptune 3 from elegoo) uses the same sensor. It’s not the most reliable sensor in the world but it got the job done until I got my BLTouch.
If you’re bed leveling with a heated nozzle, you’re not doing it right.
Shouldn’t you make your adjustments while the bed and nozzle are at least partially heated, since metal expands when heated? If you adjust z-offset when cold, the nozzle may expand a bit, decreasing the gap. At least that’s my understanding, and why most printers I’ve seen will preheat the bed and nozzle before doing bed leveling
If you’re using something like a tap or anything that uses the nozzle as the probe then you do want the bed and nozzle to be at temp (or close) so any thermal expansion is included.
Same applies if you’re using something like auto Z offset (since it’s going to be hit with the probe AND nozzle)
If you’re using something like a Klicky or BL touch then you need the bed to be temp but the nozzle doesn’t matter since you’re measuring with the probe. But… you do want the nozzle to be at temp when calibrating the Z offset so the right figure is used.
Personally… I have a Klicky (Klackender actually) and heat the bed and then dial in the zoffset with a print and baby stepping
Sure, but that doesn’t mean there won’t ever be some situation where it’ll try to Z home for whatever reason, or even if it’s just user forgetfulness, and you poke the PEI sheet with a 215+ degree nozzle. The fact that the mechanism inherently includes that possibility is stupid.
The printer won’t do any leveling with a fully heated nozzle.
The MK4’s we use at work and my personal MK4 all heat up to 170 before bed leveling, and if you previously swapped filaments before leveling, the printer will pause and wait until the nozzle has cooled down to the target range before initiating bed leveling.
Well, then at least they thought of that. Will it Z home with the nozzle preheated? I’ll bet you it will.
Did they describe the types of user error that could cause this?
Useing older firmware (was 1 version behind at the time of conversation), and a dirty nozzle which I clean regularly to prevent PETG globs from being deposited in my prints.
EDIT: The newest markings on the print bed was on the latest firmware.
The firmware they supplied with the printer?
Is there other firmware for Prusa MK4? I knew you could break a thing on the motherboard, but I thought that be some time from now.
Exactly… so I’m wondering what the user error would be. Unless it’s some weird setting update they’re thinking.
No way to know without being privy to the conversation but it makes me wonder.
This is why I presume it’s either firmware/software issue, or a sensor was defective.
If this was during an auto level, it’s my humble opinion that this is a manufacturer’s defect in the machine that caused the damage. There should be proper coding to ensure that any increase in sensor pressure by (delta p) halt that machine and that there should be a pressure offset in the sensor such that a loss of signal or anomalous zero reading or lack of reading is done prior to levelling to ensure that a sensor failure has not occurred. My XL freaks out if a fan isn’t spinning at the right speed, so they clearly know that a nominal operational check before the print starts is proper engineering design.
Of course you won’t get anywhere. Unfortunately, a lot of 3D print failures really are user error so I suspect that’s their default response and it takes them a good deal of proof to push them of that mark.
I 100% agree, however I went Prusa for their replacement parts and long term support of said parts. Rather than their quality which outside of the bed levels on uneven surfaces has been good.
Oh, I didn’t mean to come off as dissing Prusa in general. I ponied up for an XL and it’s night-and-day better than any previous printer I’ve owned.
Oof that’s rough. I have marks on mine from bad 1st layer offset from the first time or so I used the sheet on my mk3s, but they’re more just lightly shiny rather than gouges. Definitely show up on the print but it’s fine otherwise, and honestly the spots aren’t the worst.
What happened when that was going on? My experience with the voron tap a dirty nozzle would make the 1st layer offset too large and move away from the bed, not crash it.
Exactly as you said. I call it gouging since material is being removed. But the marks aren’t deep and the print surface is completely usable. Don’t have a better word for it than gouging.
As for what I was doing? Restarting a print I had to stop part way last night since the filament jammed. I looked away for a second then heard knocking from the printer and was welcomed to this beautiful new mark on my print sheet.
Wow that sucks even more, I had thought there would be a bunch of crash protections built into their firmware, prusa usually has pretty decent support so sorry you’re dealing with that.
I’d hope so too but guess not
Now do it like 5 or 6 more times on the rest of the bed and now it’s textured for extra adhesion.
So this problem is intermittent? Eep. If you’re lucky enough to be able to capture a video of the full home and print start when the problem occurs then that might help; but that might be difficult.
At this point it’s not like even if I did capture it, I’d get a new print sheet. I’ve just switch to G10/Garolite. Had good results with it before, but switch to Satin since I wanted a print bed for both PLA and PETG that didn’t destroy the Print Bed.
Are you turning off the magnetic ABL, or using it through the garolite?
MK4 uses the nozzle’s pressure sensor to level, no magnets from what I can tell.
Ah thanks, sorry, I was thinking of my MK3.
Are you sure the surface is damaged, and not just some material stuck on the sheet? Looks to me just a very thin layer of material on the sheet.
Oh I wish it was. I was even printing in clear. But sadly no it’s permanent.
I had a similar thing happen to my smooth PEI sheet. Forgot to change sheet profile before printing and printer made some noises during printing. At first thought that the sheet is damaged, but after several days noticed that the sheet is actually fine. The noise was the extruder skipping because there wasn’t enough room for the material to go anywhere, and the lines on the sheet were just a very thin transparent layer of the material. Difficult to say from the images, but the lines seem to have the texturing intact? That implies the sheet is fine. The thin lines are difficult to remove without damaging the surface, especially because you have textured sheet, so you can’t use any solvent like acetone.
Dem Barney toes
I upgraded my school’s MK3s to MK3.9s, and while it hasn’t gouged in the actual printing area, it has left a deep mark where it first extrudes a line of filament, on all of my sheets.
My problem is kind of the opposite, I feel it doesn’t give it enough squish, and I’m having a lot of adhesion issues. There is also a new cold draft in the space however, so can’t yet pinpoint the issue to this.
Josef letting us down!


